

6 Steps To Setup Google Analytics 4 With Google Tag Manager

Using Google Tag Manager (GTM) is known as the most ideal method to deploy Google Analytics 4 (GA4) on your website or app. It isn’t too complicated to set this up yourself, however; we do not recommend doing this without some previous experience with GTM or without supervision from someone who has the necessary knowledge.
The reason it is so important that you have previous experience with GTM is because it can break your website or app if not used properly. We have seen this happen in the past and it can certainly be a stressful time. If you believe you don’t have the required knowledge to set this up yourself, make sure you contact us and we can provide the assistance you need! Link: Google Analytics 4 Setup & Configuration.
For those going to give it a try yourself, here are the six key steps you need to follow for successful setup:
Step 1: Create A New GA4 Property In Your Google Analytics Account
Go to:
Admin > Property column > + Create Property.
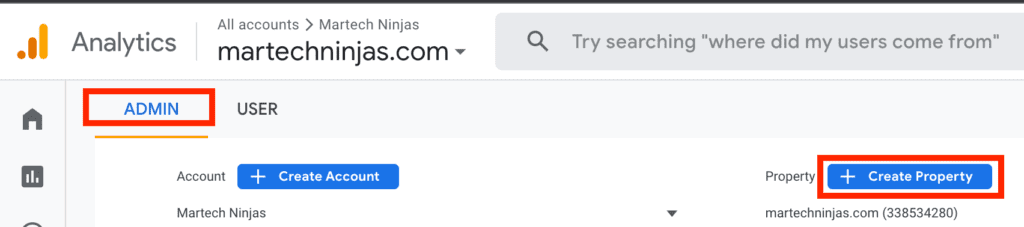
By default, you are already creating a GA4 Property. After this you will need to enter the name of your new property, which is usually your brand name. It is important to be aware that if you will end up having more than one property under the Account, then using a naming convention for consistency purposes is recommended.
Next, you need to choose the time zone for reporting by default, and the currency that business performance is reported on. If you are an international business, it can be a little tricky when it comes to choosing a time zone, however, it is important to stick to the time zone you end up choosing, as this will ensure consistency in your reporting. Also, currency is not important unless you are an e-commerce business.
Once done, press the ‘Create’ button.
Note: If you have a 360/Premium account, select ‘Property’ after clicking on the ‘+ Create Property’ button.
Step 2: Create A New Data Stream Under The Newly Created GA4 Property
Go to:
Admin > Property column > Data Streams > Add stream > Web.
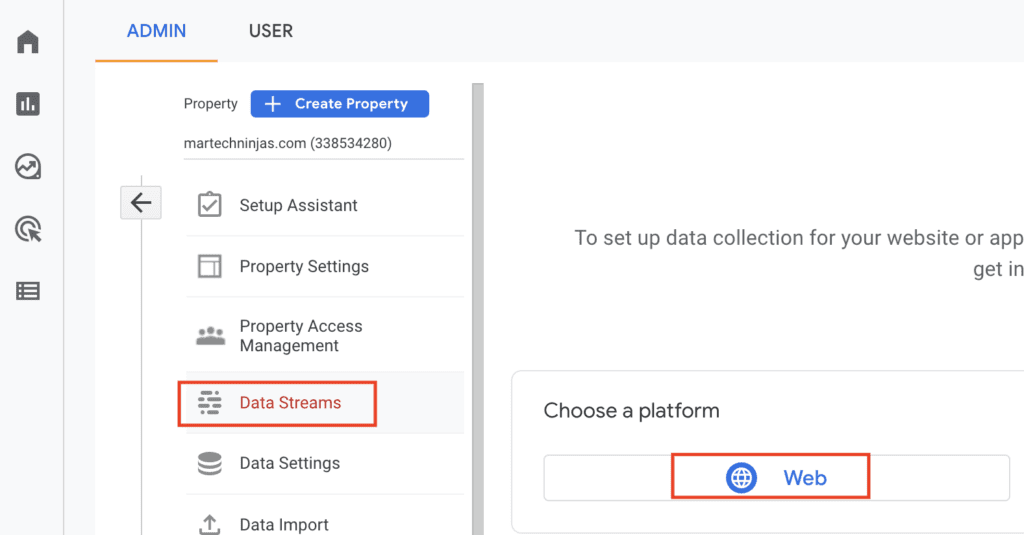
Input your website URL under ‘Website URL’ and under ‘Stream Name’ put down your brand name. Press ‘Create stream’ once done.
After successfully creating the web data stream, you will see the ‘Measurement ID’ detail which you should copy as you will refer to it on the next step.
There are events that can be measured by default thanks to the built-in ‘Enhanced Measurement’ functionality in GA4. Those events are:
- Scrolls
- Outbound clicks
- Site Search (if applicable)
- Video engagement (if applicable)
- File download (if applicable)
Enhanced measurement helps marketers and analysts measure actions without the need for development work. Except for ‘Page Views’, all the other ‘Enhanced Measurement’ events can be enabled or disabled as needed.
Note: Although it is possible to have more than one web data stream set-up under one GA4 Property, this is not recommended as it isn’t best practice. Please consult an expert to assess the best architecture for your case.
Step 3: Create A GA4 Configuration Tag In Google Tag Manager
In Google Tag Manager (GTM), select the Container that you have installed on your website. Once selected, go to Tags > New > under Tag Configuration click on the pencil > Select the type: Google Analytics: GA4 Configuration. Provide a name to your new tag, for example ‘GA4 – Configuration & Pageview’.
Paste the Measurement ID under the ‘Measurement ID’ field (refer to previous step if in doubt). Keep the box ‘Send a page view when this configuration loads’ selected so you collect the ‘page_view’ event automatically in GA4. Under ‘Triggering’, make sure you select the ‘All Pages’ trigger.
Press the ‘SAVE’ button in GTM once the above is completed.
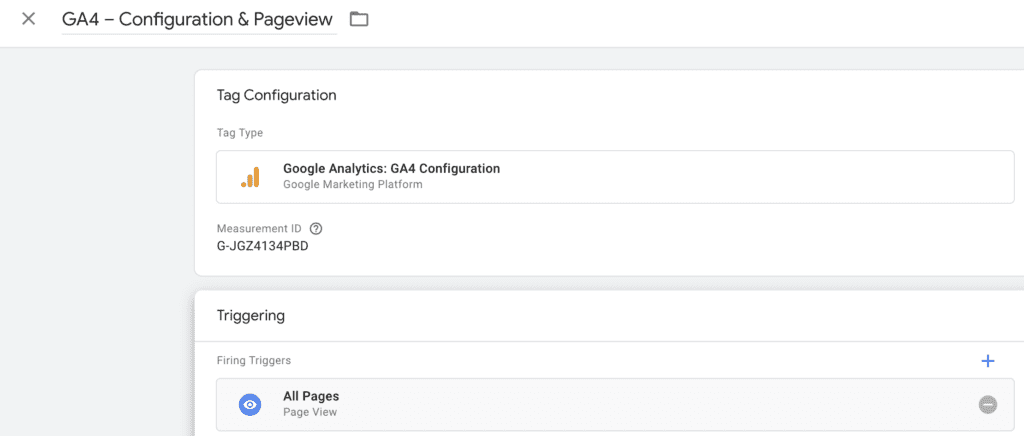
Note: The ‘Measurement ID’ detail should look like the one on the above screenshot but not identical.
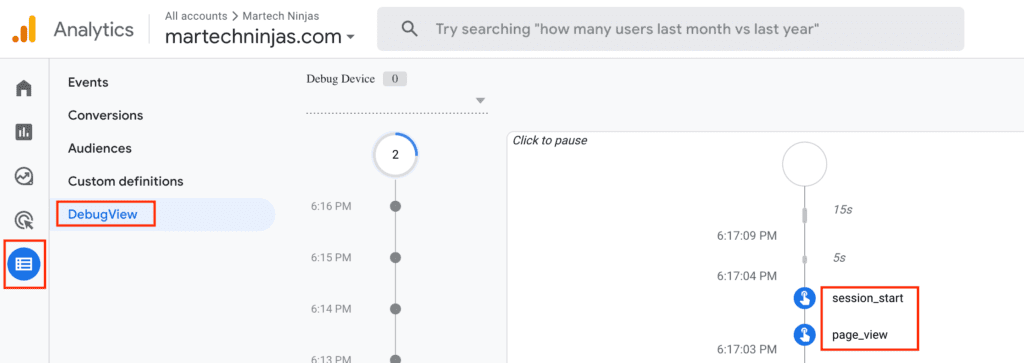
Step 4: Preview The New GA4 Configuration Tag Via GTM And Debug In GA4
Once the GA4 Configuration Tag setup is complete, in GTM click on the ‘Preview’ button and type in your website URL when prompted. On the ‘Preview debug mode’ tab, make sure the ‘GA4 – Configuration & Pageview’ tag created previously is firing along with the other marketing/analytics tags that are also configured in the Container (if any).
Now, go back to the newly created GA4 Property and click on Configure > DebugView. In ‘DebugView’, you should see the automatically collected events such as ‘session_start’ but also the ‘page_view’ event which confirms that everything is working as expected.
If you do not see anything on the ‘DebugView’ report, make sure under ‘Debug Device’ you select your device and refresh the website page which is connected to ‘Preview debug mode’ in GTM again. You will also need to refresh your GA4 ‘DebugView’ page once again.
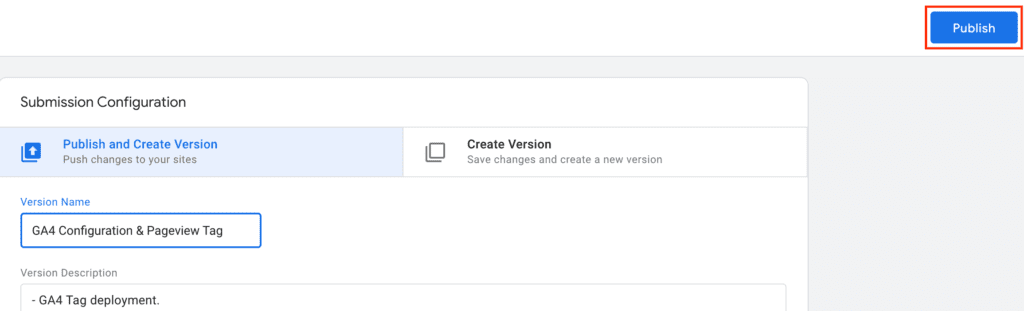
Step 5: Publish the Changes in GTM
After confirming that the events are coming through in ‘DebugView’ as expected, the last step is to publish the ‘GA4 – Configuration & Pageview’ Tag via GTM to your production website.
In GTM, click on the button ‘Submit’ and then on the ‘Publish and Create Version’ tab add a descriptive name to the changes under ‘Version Name’ and ‘Version Description’ fields accordingly. Press the ‘Publish’ button in GTM once done.
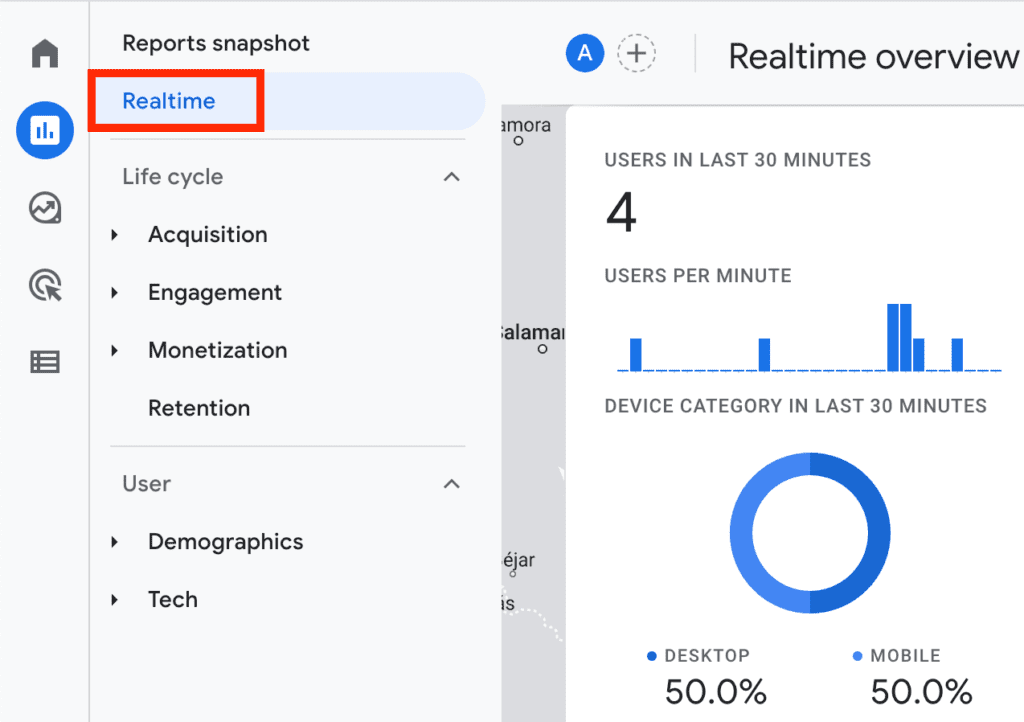
Step 6: Confirm The Data Is Coming Through In The GA4 Realtime Reporting
It can take up to 48 hours for you to see the data come through, so don’t be worried if the data isn’t available straight away. After 48 hours, in the GA4 Property created and under the Reports > Realtime reporting, you should see real customer data coming through.
Note: Events from your previous Google Analytics version (i.e. GA3) are not mapped out or migrated to GA4, therefore this will require additional configuration.
Final Thoughts
There you have the six steps to follow to successfully set up GA4 with GTM. If you have just read this article and think it’s just a little too complicated for you to set up yourself, that is completely fine and that’s why we are here!
We know all the ins and outs of how to set this up properly, we have a dedicated team ready to help guide you through the process. This means you can rest easy knowing we will take care of everything and you can get the most out of your GA4, as well as your GTM. Be sure to reach out to us today to get the ball rolling!

I am the Martech Ninjas founder, covering all things digital analytics. With 10+ years’ worth of experience in marketing and analytics, and having the privilege of working across 4 different countries, I have seen it all! Something I have always seen in the world of digital analytics is how poor data quality and the lack of standardisation is hurting businesses in their data-driven decisions to achieve growth. When I’m not immersed in the world of digital analytics, I enjoy working out and try new cuisines – yes, in this order!
Most Viewed Blog Post
Why manual UTMs from Google Ads do not show up in GA4?
Why GA4 Landing Page Report Shows “Not Set”
How To Fix the GA4 Landing Page Report Not Aligned with GA3
Related Articles

Get a Free
GA4 Guide
Enter your name and email address. We'll send you a free copy of our GA4 guide, which highlights the importance of migrating to GA4 and its amazing benefits for your business.